Actions
Putting a stock item into a stored, opened, or frozen state
An action screen
An action screen is where you set stock item properties when performing, or editing, an action. There are two types of action: product-based, and non-product-based.
Product-based actions
A product-based action is initiated by tapping on an action button. Stock item action information is auto-filled using action information held by the product. You can change any stock item properties that are not intrinsic to the product. These are the name, the location (although the location type must stay the same), and any applicable action dates. You can also add a note. For examples of product-based actions, see the ready meal, tomato purée, and frozen peas pages.
Non-product-based actions
A non-product-based action is initiated when creating a new stock item. Stock item action information is auto-filled using default values, which are the same default values as used when setting up a product. You can change any of the stock item properties, and you can also add a note. For examples of non-product-based actions, please see the screenshots below.
Exiting
To exit an action screen, tap on Save or Cancel. If there have been no changes, you can also exit by swiping down.
The Save button
If you are performing an action, tapping on the Save button will confirm the action. If you are editing an action, it will confirm changes to the action. Any newly created brands and/or locations will also be saved, and these will be listed in your Brands and/or Locations tabs. If the stock item does not have a photo, you will be asked if you would like to add one.
The Cancel button
If you are performing an action, tapping on the Cancel button will cancel the action. If you are editing an action, it will cancel changes to the action. Any newly created brands and/or locations will also be cancelled.

Store action
This screenshot shows the result of using the Store action on a new stock item.
You need to give the stock item a name. You may need to change the brand, and the action information. You will probably need to change the expiry date, which has a default value of Today. You can also add a note.
Confirming the action will store a stock item in the specified location. It will then be listed as a stock item in your Stock tab. You will be asked if you would like to add a photo.

Open action
This screenshot shows the result of using the Open action on a new stock item.
You need to give the stock item a name. You may need to change the brand, and the action information for both the Store and Open actions. You will probably need to change the expiry date, which has a default value of Today. You may also need to change the date of opening, if you didn't open it today.
Confirming the action will put an opened stock item in the specified location. It will then be listed as a stock item in your Stock tab. You will be asked if you would like to add a photo.
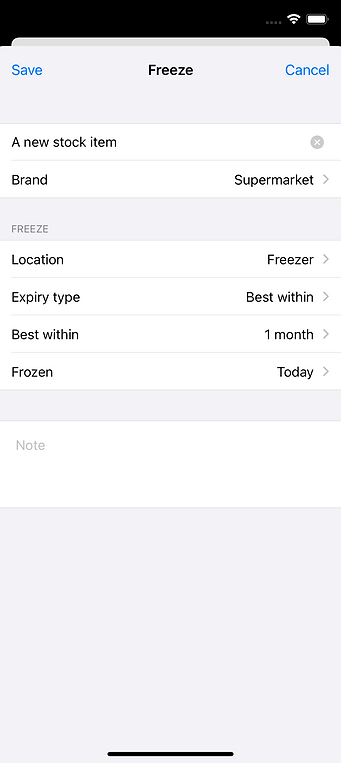
Freeze action
This screenshot shows the result of using the Freeze action on a new stock item.
You need to give the stock item a name. You may need to change the brand, and the action information. You may also need to change the date of freezing, if you didn't freeze it today.
Confirming the action will freeze a stock item in the specified location. It will then be listed as a stock item in your Stock tab. You will be asked if you would like to add a photo.